Saturday, June 5, 2010

Play Test of "Remember the Maine and to He** with Spain"

Today several of us play tested Jay's Bayou Wars game, Remember the Maine and to He** with Spain!.  Jay has modified Travis' Seas of Steel WW2 naval rules to accommodate the much less technological pre-dreadnought ships of the American and Spanish navies.  Jay also made some equalizing changes in both naval orders of battle, especially the Spanish.  Jay's game will be on Saturday afternoon at 2:00 pm. (Convention schedule and details at the Bayou Wars home page.)

Remember, please click on the pictures for a larger image.

We played the scenario through twice as it went very fast!  The first play through was the original orders of battle:  the Spanish four cruisers and two torpedo boat destroyers versus the Americans four battleships, two cruisers, and two armed yachts/torpedo boat destroyers.  All ship models are 1:2400 scale and are from Panzerschiffe's Spanish-American War range (link).

The Spanish cruisers (Maria Teresa, Almirante Oquendo, Viscaya, and Cristobol Colon) break out of the harbor of Santiago de Cuba.

The USS Oregon quickly gets underway in pursuit of the Spanish squadron.  Even though she had speed-sailed from the Pacific, she was the most combat ready of the American ships.

The Uss Iowa and the USS Indiana slowly get underway.

The older coast defense ship USS Texas (or a reasonable facsimile thereof) slogs away from her anchorage.

The four Spanish cruisers speed away from the American ships.  It is every captain for himself and the Devil take the hindmost!

The cruiser USS Brooklyn leads the USS Texas and the USS Oregon after the fleeing Spanish ships.  While the Oregon was at full speed, the  Texas and the Brooklyn were never able to gain full speed.

What's this?!?  A torpedo hit on the USS Iowa!!!
A  Spanish torpedo boat destroyer was able to get close enough to loose a torpedo which actually struck its target before the destroyer succumbed to American gunfire.  The Iowa slowly began to take on copious quantities of water and the captain ordered, "Abandon ship!"

The USS Gloucester, with no more Spanish torpedo boat destroyers left, rushes to rescue the crew of the sinking Iowa.

The Spanish cruisers get more separated as their different speeds begin to tell, as does the damage inflicted by the American gunnery.

A closer shot of two of the Spanish cruisers, the Almirante Oquendo on the right and the Cristobol Colon (I think) on the left, as they flee from the Americans.

The first Spanish cruiser (Maria Teresa ,I think) succumbs to the concentrated American gunfire.

But the Spanish also draw more blood as they sink the USS Brooklyn which was leading the American charge and was the target for several of the Spanish cruisers.

But the Americans get revenge, putting the Almirante Oquendo under the waves.

The Cristobol Colon is the next (and third) Spanish cruiser to be sunk.

And finally the Viscaya joins her sisters in Davy Jones' locker.

Final results:  Spanish -- four cruisers and two torpedo boat destroyers sunk versus American -- one battleship and one cruiser sunk.

We then reset the game and add more Spanish and American ships.  The Spanish ships were the battleship Pelayo, two armored cruisers, an unprotected cruiser, and three torpedo boat destroyers.  The Americans added the USS New York, the USS Massachusetts, and a torpedo boat destroyer.  Could the additional Spanish ships swing the tide against the Americans?  Nah, not really.  The additional Spanish heavy ships were played by stand-ins as Jay had not received his order yet from Panzerschiffe.

This was, I think, the stand-in for the Pelayo.

And here is the stand-in for the Carlos V, an armored cruiser.

The Spanish armada (strung out on the left) and the American fleet (on the right) make similar moves as the Spanish attempt to flee down the coast.  The Spanish torpedo boat destroyers tried to close with the American ships but were quickly blown out of the water before they came within torpedo range.

One by one, the Spanish ships were blasted to bits (two are shown sinking on the left) but the American cruiser Brooklyn was sunk again.  The lead Spanish cruisers ganged up on her.

Final results:  Spanish - one battleship, seven cruisers, and five torpedo boat destroyers sunk versus one American cruiser sunk.

So, lessons learned:  Even with the tweaks in increased gunfire ability and armored protection and in more ships, the Spanish were still outclassed by the American fleet.  Should the Spanish have tried to immediately close the range and engage the Americans in a close-range gunfight?  Maybe that's something for the Bayou Wars Spanish players to try.  One thing we did note was that the Spanish torpedo boat destroyers should be sheltered behind the bigger Spanish ships until the range is closer so they can try to get in torpedo range while the Americans have many targets for their secondary batteries.  When the TBDs try to close early, the Americans can shoot at them with the secondary batteries while the Spanish heavies are out of those guns range.

But whatever happens, it is a fun, quick game that might see two complete run-throughs Saturday afternoon.

Monday, May 31, 2010

Escape of the Agincourt playtest

On May 29th, we played a test game of my Bayou Wars game, Escape of the HMS Agincourt. We actually played two games, as it became obvious in the first playthrough that I made some errors in setting it up. The goal of the British and Americans was to get the Agincourt off the far table end, while the Germans and French had to destroy her.

Here are photos of the two games, along with commentary. As always, click to view a larger image.


The British light cruiser Rawalpindi, commanding the British coastal defense digs.


The rag-tag remnants of a strike fleet comprised of British and American ships frantically make their way back to Britain's shores.


A small squadron of British Aeronef were in their docks for refit and lifted off to assist in the defense.


A French raiding flotilla racing in to cut off the British fleet's escape.

The strike fleet turns to gain more distance against the faster French vessels, with the Agincourt struggling along behind.


British fire caused a critical hit which set this German vessel ablaze. The red marker on the Rawalpindi indicates that the ship has fired, to help the players keep track.


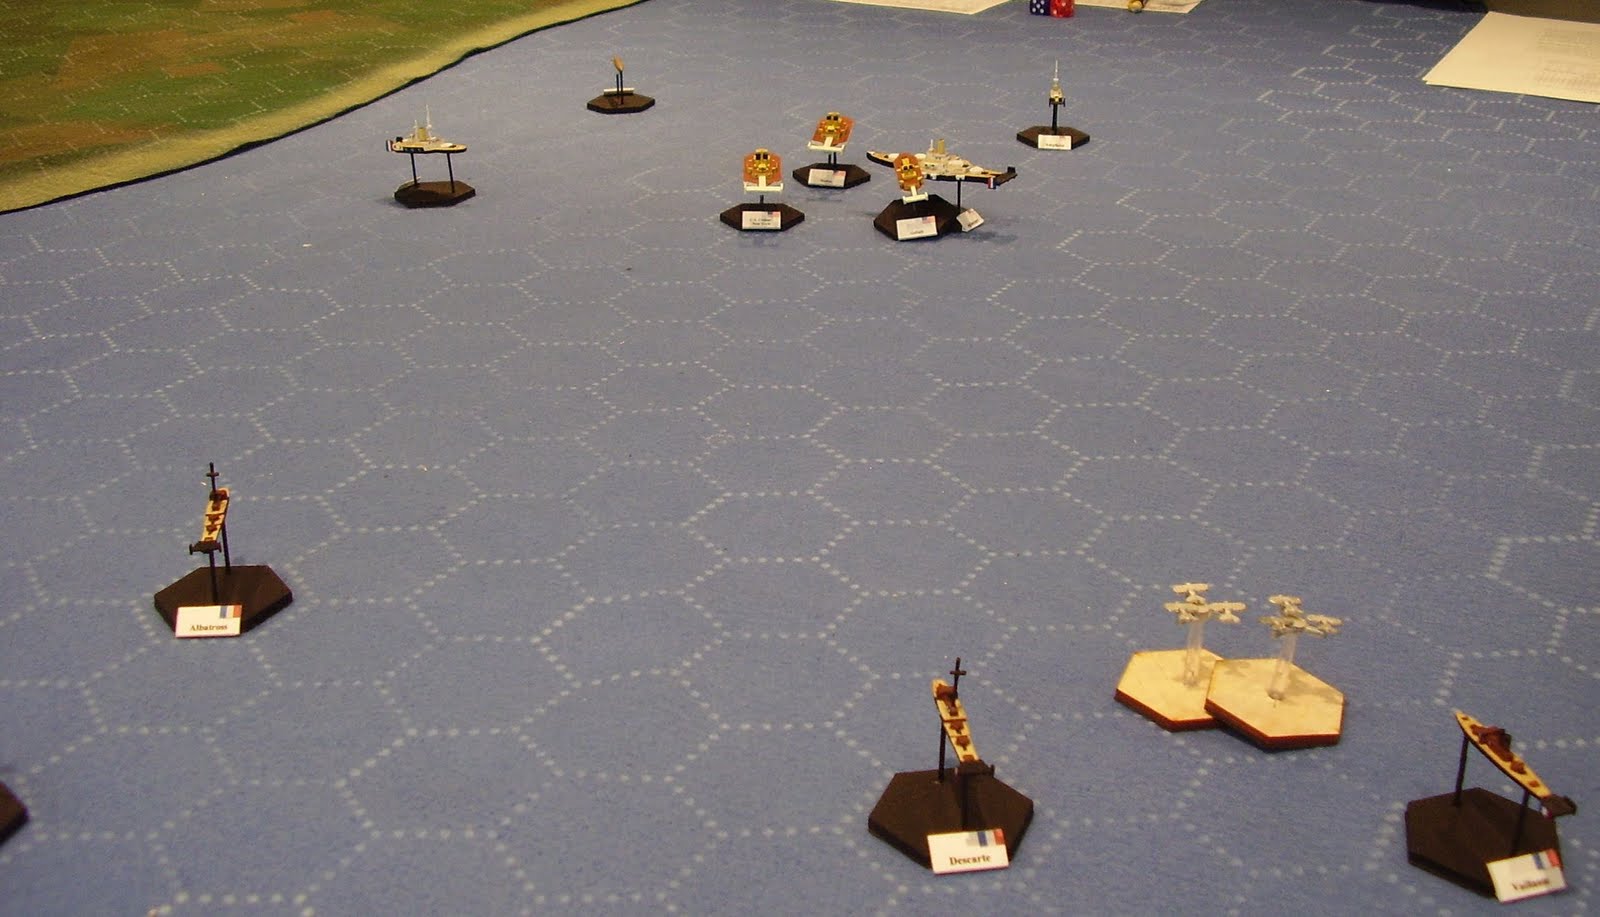
French fighters (launched from the 'dig carrier Les Arc) swarm after the Agincourt as the Germans and French encircle her. This is where I began to see the problem I had created; the Agincourt simply wasn't fast enough to escape. After some discussion, we decided to reset the game and fiddle with the settings a bit.


Setup was much the same. We added some coastal defense batteries, marked by the empty bases along the coastline.


The strike fleet moves straight toward the coast as the enemy quickly closes the distance. This time, the engine damage wasn't as severe, only limiting her to Cruise speed rather than Slow.


Fire from the defense batteries takes its toll on the French cruiser Formidabile, causing fires to break out on her hull.


The French destroyer Albatross, her weapons batteries reduced to uselessness, flees the battle while the Les Arc launches more fighters in the distance.


The swift French vessels were torn to pieces by the concentrated fire of the British and Americans. Note that the defensive batteries have moved; we decided the fire was _too_ concentrated, and spread them out more so they wouldn't be quite so overpowering.


The fleet moves closer to its goal, harried by the Les Arc's fighters. The Germans continue to close, heavy fire tearing into the fleet. The Agincourt took two criticals at this point. One damaged the engines further, reducing her to a maximum of Slow and forcing her to coast to a halt until repaired. The second damaged her rudders, locking her into a slow left turn. The rudder damage was repaired at the end of this turn.


Two turns later. The Agincourt never managed to repair her engines. the attacking ships managed to penetrate the defensive batteries and destroy her from point-blank range.


Overall it went well. The second game took about two and a half hours, with players who were familiar with the system. The game itself is easy to pick up (it is based on A Sky Full of Ships, though heavily modified). I expect that I can easily explain the rules to the players and comfortably fill the four hour time slot.

Naval Action in the Slot

On Memorial Day, Travis came over from Vicksburg and introduced a few of us to his new WW2 naval rules, Seas of Steel.  We pitted a Japanese force of four battleships (including the Yamato), one light cruiser, and two destroyers against an American force of three battleships and five destroyers.  The Japanese mission was to scatter the US ships and bombard Henderson Field on Guadalcanal, rendering it unusable to American aircraft.  The Americans were out to stop the Japanese and sink as many of their ships as possible.  We used Travis' 1:2400 scale warships that he painted a good while ago.

Travis' rules are simple but give an excellent rendition of WW2 naval action.  Even our own expert, Jay, gave them 2 thumbs up!

Here are the pictures I took with brief captions.  As usual, please click on the pictures for a larger image.

The Japanese battleship Fuso glides through the deep waters of Iron Bottom Sound on its way past Savo Island and a rendezvous with destiny.

The American left division, the battleships Washington and North Carolina, supported by two destroyers.

The Japanese Fuso battleship ablaze from a lucky American hit.  Fortunately the well-trained damage control on the Fuso extinguished the fire immediately.  In Travis' rules, fires continue to burn until brought under control, inflicting a 1/2 hull box damage per turn.  On a smaller ship, that can be fatal.

The right hand American column of the battleship South Dakota and three destroyers (one is trailing the battleship) target the lead Japanese ship, the cruiser Nagara, of the Japanese left hand column.  She has also been set ablaze but her damage control parties could never bring the fire under control.

Another fire is started on the Japanese battleship Nagato which took several turns to extinguish.

After firing its torpedoes at the Washington (and missing), the Japanese destroyer supporting the right hand division is finally sunk along the shore of Guadalcanal.  A few of the ship's company got to shore and joined their comrades in the Imperial Army to continue the fight.  Banzai!!

Almost immediately thereafter, the Fuso blasts an American destroyer to bits, fortunately before she could fire torpedoes.

But horror of horrors!  The Yamato's big guns plus three Long Lance torpedoes put the South Dakota down.  Here it explodes as it goes to join the wrecks littering the bottom of Iron Bottom Sound.  The ship behind her is the Japanese destroyer who fired the torpedoes.  She is continuing towards Henderson Field.

The Japanese right column battleships, Fuso (lead) and Nagato, continue to engage the Washington and North Carolina (background) while a surviving American destroyer makes a frantic torpedo attack.  Luckily for the Fuso, the American torpedoes functioned as they normally did and no hits were made.

But as soon as the Fuso cleared Savo Island, the North Carolina gave her the coup de grace as she explodes and sinks.  That's one American and one Japanese battleship sunk, so far.

And then the Yamato brings her heavy guns to bear on the North Carolina.  Oops, not surviving anymore as she joins her sister on the bottom of Iron Bottom Sound.  The Washington is in the background.

And the Yamato serenely continues on her way towards Henderson Field.

The outcome of this encounter was that the Japanese succeeded in bombarding Henderson Field, but with just the Yamato still in fighting shape (the Kirishima and Nagato were badly damaged) and only one destroyer left, they couldn't hang around.  The Americans only had one battleship still afloat and she was damaged.  They lost two battleships and all five of their destroyers.  The Japanese lost a battleship, a light cruiser, and one destroyer; the Yamato was hardly scratched, but their other two battleships were heavily damaged.

We all liked Travis' rules and look forward to playing them again.

Monday, May 24, 2010

Relief of Wadi Zoum-Zoum - 2nd Play Test

I conducted the 2nd and final play test of my Bayou Wars convention game on Saturday, May 15.  I had made a few troop changes and included some supply objectives for the attacking native forces to destroy.  Here are some pictures of the game, which ended in a significant Imperial victory even though all of the Egyptian cavalry, one Egyptian infantry platoon, and one Egyptian gun were destroyed.

Please click on the pictures for a larger version.

An overview of the battlefield with the zariba and supply base on the center right and the Baja, Dervish, and Arab forces arrayed around it from center left through upper right.

The initial advance of the Dervish and Beja warriors against the zariba.  In the background, the two Arab clans also advance.

The initial attack by Dervish (on left) and Arab (center) warriors against the zariba.

The Dervish warriors attack the zariba and, in the background, the Arabs prepare to assault the gate area.  In the foreground, a unit of Beja warriors await their turn to make an assault.

The Egyptian platoon has fled from the gate area after taking heavy casualties.  A gun lies abandoned while its gunners man another gun in the artillery emplacement to the left of the gate.  Arab  warriors stand ready to attack the abandoned gate.

A view of the riverine relief force as it prepares to turn into the landing and disembark its Royal Marines and Naval infantry.  Some of the Beja and Dervish warriors got a little to close to the water's edge and were punished severely by the Gatling and Nordenfeldt machineguns on the gunboat and the steam launches.

A unit of Arabs has penetrated through the gate, followed by a second unit which is trying to attack the rear of the Sudanese defenders.  In the background, the lead transport turns into the landing to disembark its infantry.  You can also note that the Dervish and Beja units in the previous picture have been sent fleeing.

A slightly different view of the Arab penetration of the zariba gate.  The Sudanese have successfully turned to face their attackers and will repulse them after some hard fighting.  To the far left, the remnants of the Egyptian platoon have been rallied by the garrison sergeant major and are forming to engage the lead Arab unit.

While all the fighting is going on around the zariba, the Egyptian cavalry arrives on the battlefield.  Although the Egyptian lancer troop was destroyed by the fire of the Dervish guns, the mercenary Baluchis and Bashi-Bazouks are attempting to avenge their comrades and overrun the guns.  The Baluchis will get right up to the muzzle of one of the guns before they are blown from their saddles by the unusually accurate fire of the pressed gunners.  The Bashis also will not be able to stand the severe pounding and will withdraw.

Captain Harrington, the commander of the riverine force, gazes into the fighting within the zariba as his gunners search for lucrative targets.

For the actual convention game, I will adjust the native deployment, simplify the boats movement and turning characteristics, and make a few other minor adjustments.  The game will be a race between the natives trying to break into the zariba and destroy the defenders and supplies and the riverine force trying to get their Royal Marines, Naval infantry, and Gatling guns landed to come to the rescue.  It should be a fun game that will go right down to the wire.

Saturday, April 24, 2010

Relief of Wadi Zoum-Zoum - 1st Play Test

On Saturday, April 17, I ran the first play test of my Bayou Wars convention game, The Relief of Wadi Zoum-Zoum.  It went fairly well and I learned some things that will hopefully improve the scenario.  A second (and final) play test will be on Saturday, May 15, with the actual convention game being on Saturday, June 12.

The scenario pits an initially small force of Egyptian and Sudanese infantry defending a supply base along the Green Nile against a large force of desert Arabs, Mahdists, and Beja (AKA Fuzzy-Wuzzy) warriors led by the Agandar of Karres.  But the defenders have reinforcements coming by river (British naval force) and land (Egyptian cavalry).

Here are some of the pictures I took during the play test.  Click or double click on the pictures to increase the size of the image for better viewing.


Here is a view of the overall battle field, with the Green Nile flowing from upper right to lower left and the supply base with its thorn zariba in the outside of the river bend.  The native attackers are being deployed by their commanders (from left, Phil Young, Bill Hamilton, and Travis Melton).  The defenders were Ed Sansing (Egyptian infantry), Sean Pitts (Egyptian cavalry), and Jay Stribling (British riverine force).


Part of the supply base showing a close-up of one of the artillery emplacements and the zariba being defended by a platoon of Egyptian infantry.  The main gate is in the background, defended by a platoon of Sudanese infantry.


The Red Hawk clan (desert Arabs) and the two captured Egyptian Krupp guns (manned by pressed gunners) are massed in some rough ground prior to beginning their assault.


In the foreground, the White Eagle clan (desert Arabs) moves towards the zariba while in the background the Golden Cheetah clan (Beja warriors) also advances.  The green clothed cavalry unit is the Agandar's bodyguard.  Himself is in their midst.


The Black Panther clan (Mahdists in patched jibbas, on left) and Red Hawk clan (on right) attack the zariba.  The main gate is flanked by two artillery emplacements which are engaging the attackers.

The British riverine force arrives!  They are led by the gunboat HMS Claymore with the smaller gunboat HMS Shillelagh trailing while one of the transport steamers is to the left.  Part of the Egyptian cavalry force (in this case a unit of Baluchi mercenaries) is on the riverbank.

The White Eagle clan (on right) and Golden Cheetah clan (on left) now launch their attack upon the zariba. At this point it is defended by a unit of tribal levies.  They are glad that they have the impenetrable zariba between them and the attackers.  In the background, the initial attack on the main gate has been repulsed.


The Golden Cheetah clan Beja warriors have succeeded in setting the dry thorn zariba alight (gray smoke in center).  Some of the tribal levies are trying to put it out but they aren't successful.  In the background, the second assault on the main gate is successful as a unit of cavalry ride through the undefended gate while infantry units swarm over the empty artillery emplacement.


In this final view, the various native clans swarm into the zariba after the original defenders are dispersed.  But drawn up across their path is the British riverine force:  a platoon of Royal Marine Light Infantry, two platoons of Naval infantry, and two Gatling guns, supported by the weapons of the two gunboats and two steam  launches.

Due to the lateness of the hour, I decided to call the play test at this point.  The British gun fire was already making severe inroads on the strength of the native attackers.  I decided that the riverine force needs to come on earlier (at Turn 1 rather than Turn 2) because of the speed of the boats.  Also the riverine force will loose one gunboat and the platoon of Royal Marines.  With these changes. we'll test the scenario again in May.