The scenario pits an initially small force of Egyptian and Sudanese infantry defending a supply base along the Green Nile against a large force of desert Arabs, Mahdists, and Beja (AKA Fuzzy-Wuzzy) warriors led by the Agandar of Karres. But the defenders have reinforcements coming by river (British naval force) and land (Egyptian cavalry).
Here are some of the pictures I took during the play test. Click or double click on the pictures to increase the size of the image for better viewing.
Here is a view of the overall battle field, with the Green Nile flowing from upper right to lower left and the supply base with its thorn zariba in the outside of the river bend. The native attackers are being deployed by their commanders (from left, Phil Young, Bill Hamilton, and Travis Melton). The defenders were Ed Sansing (Egyptian infantry), Sean Pitts (Egyptian cavalry), and Jay Stribling (British riverine force).
Part of the supply base showing a close-up of one of the artillery emplacements and the zariba being defended by a platoon of Egyptian infantry. The main gate is in the background, defended by a platoon of Sudanese infantry.
The Red Hawk clan (desert Arabs) and the two captured Egyptian Krupp guns (manned by pressed gunners) are massed in some rough ground prior to beginning their assault.
In the foreground, the White Eagle clan (desert Arabs) moves towards the zariba while in the background the Golden Cheetah clan (Beja warriors) also advances. The green clothed cavalry unit is the Agandar's bodyguard. Himself is in their midst.
The Black Panther clan (Mahdists in patched jibbas, on left) and Red Hawk clan (on right) attack the zariba. The main gate is flanked by two artillery emplacements which are engaging the attackers.
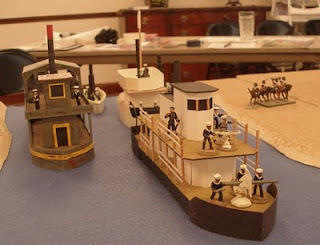
The British riverine force arrives! They are led by the gunboat HMS Claymore with the smaller gunboat HMS Shillelagh trailing while one of the transport steamers is to the left. Part of the Egyptian cavalry force (in this case a unit of Baluchi mercenaries) is on the riverbank.
The White Eagle clan (on right) and Golden Cheetah clan (on left) now launch their attack upon the zariba. At this point it is defended by a unit of tribal levies. They are glad that they have the impenetrable zariba between them and the attackers. In the background, the initial attack on the main gate has been repulsed.
The Golden Cheetah clan Beja warriors have succeeded in setting the dry thorn zariba alight (gray smoke in center). Some of the tribal levies are trying to put it out but they aren't successful. In the background, the second assault on the main gate is successful as a unit of cavalry ride through the undefended gate while infantry units swarm over the empty artillery emplacement.
In this final view, the various native clans swarm into the zariba after the original defenders are dispersed. But drawn up across their path is the British riverine force: a platoon of Royal Marine Light Infantry, two platoons of Naval infantry, and two Gatling guns, supported by the weapons of the two gunboats and two steam launches.
Due to the lateness of the hour, I decided to call the play test at this point. The British gun fire was already making severe inroads on the strength of the native attackers. I decided that the riverine force needs to come on earlier (at Turn 1 rather than Turn 2) because of the speed of the boats. Also the riverine force will loose one gunboat and the platoon of Royal Marines. With these changes. we'll test the scenario again in May.


