Monday, April 18, 2011

Battle of Fort du Fromage

In preparation for our upcoming Gulf-South regional convention (Bayou Wars), Col Campbell ran his Gallian (French) and Indian War game this past Saturday.  Eight of us met to do battle amongst the forests of the New World.

The Gallians had, several years earlier, built a small fort to guard the route through the Fondue Pass.  Set astride Cheddar Creek, the Fort du Fromage was later abandoned and fell into ruin.  But further incursions by Britannia's 'Murican colonists sparked the Gallian Governor-General of Canadie to send an expedition to refurbish the fort.  Commanded by le Compte de Argent, it consisted of his regiment (the Regiment Beaujolais, with two companies of fusiliers, a company of grenadiers, a detachment of picquets, and a battalion gun), a battalion of two companies of Compagnies Gallien de la Marine, a battalion of three companies of Canadien militia and a battalion gun, and a double warband of Allied Huron Indians.

Getting wind of this expedition, the Britannian commander deputized Colonel Murdaugh to lead his regiment (the 5th Foot of two center companies, and company of grenadiers, and a battalion gun), a battalion of infantry (a company of the 15th Foot, a company of the 60th Foot, and a battalion gun, plus an attached company of provincial light infantry), a battalion of two companies of Rangers and light infantry, and a battalion of three companies of provincial militia to oppose the Gallians.

We used The Sword in the Forest variant of the venerable The Sword and the Flame rules.  With the exception of the companies of the 15th and 60th Foot (owned by Doc Ord), all figures are owned and painted by Col Campbell.  Unless otherwise indicated, all pictures were taken by Col Campbell.  Please click or double-click on each picture for a larger image.

The area of the Pass of Fondue, with the ruins of the Fort du Fromage in the center, bisected by Cheddar Creek.  The Gallians entered on the right edge (north) and the Britannians entered on the left edge (south).  The two hills (near and far) delineate the Pass of Fondue.  The woods were considered rough terrain as were both wooded hills and the ground inside the ruins of the fort.

The composite Britannian battalion commanded by Lieutenant Colonel Sansing advances steadily, with two companies of regular infantry (15th in lead, followed by 60th), a battalion gun, and a small company of provincial light infantry.

The Gallian Regiment Beaujolais, commanded by le Compte de Argent, advances towards the ruins of the Fort du Fromage.  The picquet detachment is on the right while the two fusilier companies and the battalion gun advance through the gap in the woods.  The grenadiers are slowly moving into the woods on the left.

Two of the three Canadien militia companies and the battalion gun of the battalion commanded by Major Phillippe Jeune advance towards the western Hill of Fondue.  Major Fondue is encouraging his men from the rear by waving his hat!

A broad view of the center of the pass with the ruins of the Fort du Fromage being contested by the Regiment Beaujolais (left) and the 5th Foot (right) who are supported by the 15th/60th Foot (foreground).

On the east end of the pass, the combined Ranger and Allied Indian company of Major Pitts (the younger) face off against the two Gallian allied Indian warbands of Chief Schneider, an Alsatian-Huron warrior of great renown.

Photo by Big John
The Britannian 5th Foot advances into the ruins of the Fort du Fromage.  The grenadiers quickly occupy the remaining building of the old fort but find nothing except abandoned animal nests for loot.  In the background are elements of the Regiment Beaujolais and the Compagnies Gallien.

On the east side of the fort's ruins, Major Pitts' other Ranger/Light Infantry company protects the right flank of the 5th Britannian Foot as they oppose the advance of Major Jacques Argile's Compagnies Gallien.

Back on the west side of the pass, Major Jeune's Canadien militia face off against Col Campbell's 'Murican provincial militia on the west Fondue Hill and along the low ground to the right.  The opponents on the hill traded volleys for several turns.

Photo by Big John
The command of Lieutenant Colonel Sansing also advances against the western Fondue Hill with the provincial light infantry and the company of the 15th Foot in the lead, supported by the company of the 60th Foot.  The grenadiers of the Regiment Beaujolais are lining the woods in the right rear of the picture.

Chief Schneider's Indians suddenly charge the Rangers and Allied Indians of Major Pitts.  Although one of Chief Schneider's warbands failed to close, the other did and a hard-fought melee ensued.  Clubbed muskets and tomahawks mashed and slashed among the combatants.

Major Argile's Compagnies Gallien trade volleys with the 5th Foot and Major Pitts' Rangers/Light Infantry, while in the center of the fort the other half of the 5th Foot slowly closes with part of de Argent's Regiment Beaujolais.
In the center of the picture, Chief Schneider's Indians celebrate their victory over the vaunted Rangers of Major Pitts, who have with drawn in confusion (foreground).  In the background, the other warband huddles in the protection of the eastern Fondue Hill.  The next turn, Chief Schneider's Indians were awarded the first movement card, charged the confused Rangers before they could rally, and drove them from the field.

Photo by Big John
Chief Schneider's victorious warriors realign themselves for further action against the Britannians.

Photo by Big John
Chief Schneider hopes to engage the other part of Major Pitts' command of Rangers and Light Infantry who are covering the right flank of the 5th Foot.

In the ruins of the fort, the Britannian 5th Foot continues to trade volleys with elements of the Regiment Beaujolais and the Compagnies Gallien.

Photo by Big John
In the far background, one of Major Jeune's Candien militia companies tried to charge, failed to close, and had to withdraw.  Just to the left of the western Fondue Hill, another of Major Jeune's companies, supported by a battalion gun, trade volleys with one of Col Campbell's provincial militia companies.  On the right the Britannians mass to assault the western Fondue Hill.

The combined Britannian assault of Col Campbell's provincial militia and Lieutenant Colonel Sansing's provincial light infantry succeeds in driving Major Jeune's Canadien militia off the hill, leaving only Major Jeune himself, forlornly waving his hat at his departing troops.  Sansing's provincial light infantry now turns their attention to the grenadiers of the Regiment Beaujolais.

Photo by Big John
The 5th Foot succeeds in holding their own in the fort's ruins against the Regiment Beaujolais.  On the far left are what remain of one of the two fusilier companies of the Regiment Beaujolais, as well as their battalion gun with its crew lying dead around it.  The 5th Foot's battalion gun, as well as the company of the 60th Foot (out of picture to left) were the dealers of death and destruction in this area of the battlefield.

One of the final actions of the day involved Lieutenant Colonel Sansing's provincial light infantry trading volleys with what was left of the Regiment Beaujolais grenadier company.

As darkness fell, le Compte de Argent decided that he was too weak to continue the action and his Gallian regulars, Canadien militia, and Huron Indians melted into the woods, leaving the bloodied Britannains in charge of the ruined Fort du Fromage and the Pass of Fondue.

All in all, the game went well and appeared to be fairly well balanced.  Some better dice rolls on the part of le Compte de Argent might have resulted in a victory for the Gallians.

Additional pictures may be found on Big John's Nomadic Old School Gamer blog (link is to the upper right, under "Member Links").

Tuesday, March 29, 2011

Here there be pirates !

On March 19th we played a pirate wargame, using The Sword in the Caribbean rules. We had 6 players who played the following crews or units:

Pirates
Capt. "Red" Sonya's crew - played by Jim
Capt. "Smilin' Jack" Hawkins - played by Jay

Spanish
Capt. Don Diego de la Vega - played by Russ

English
Capt. Bartholomew "Black Bart" Bligh - played by Phil
Capt. Lord Pavel Young - played by John
Royal Marine garrison - played by Sean

Each company or crew was made up of 2 12-15 man "bands" or units. Each unit had secret instructions that defined their mission.


Here we are setting up the terrain. You see Jay (taking the picture), game master Ed, pirate captain Jim and captain Phil.

The picture were taken by Jim and John. Click on a picture to see a bigger version.


The village market.


Another view of the village, from the direction most of the pirates will approach.


The native village


That's all for now. I'm shutting down my computer because a thunder storm is approaching and dropping pea to marble sized hail at my house right now.

I'm back tonight to finish the battle report!

Here we see the British marines patrolling the island.

This unit was painted by Jim. Their mission
was to defend the village and water supply
and make sure the new governor survived.


This is the other part of the British marine company.


Some of Phil "Black Bart" Bligh's sailors
gather at the edge of the village to defend
it from marauders. The 2 crews in town
both had the mission to defend the food
and supplies in the market.


Russ' Spanish militia advance on the village.

The scenario said that the Spanish had just
handed over the island to the British but the
Spanish garrison commander didn't like this.

Before he set sail to return to Spain he had
made it his mission to kill the new British governor.

The pirate crew of 'Red' Sonya enters the board.
Their mission was to get to the chapel, and find
the treasure. They were required to capture one
of the priests and 'question' him to find the valuable
artifact.


The rules have a special section on how torture prisoners to get information. Quite a few of the results have the prisoner dying.
'Smilin' Jack' Hawkins' crew attacks the Royal marines.

The pirates' mission was to find water and supplies
but after being fired on by the British they did
what pirates do .


After the first part of the melee one British unit
has retreated. The other unit has gotten behind
the pirates and will continue the fight.

In the end the pirates had to pull back. One unit
failed morale and headed for their ship without supplies.


Spanish commander Russ

Pirate Jay

Game master Ed


Russ' Spanish push toward the village, avoiding
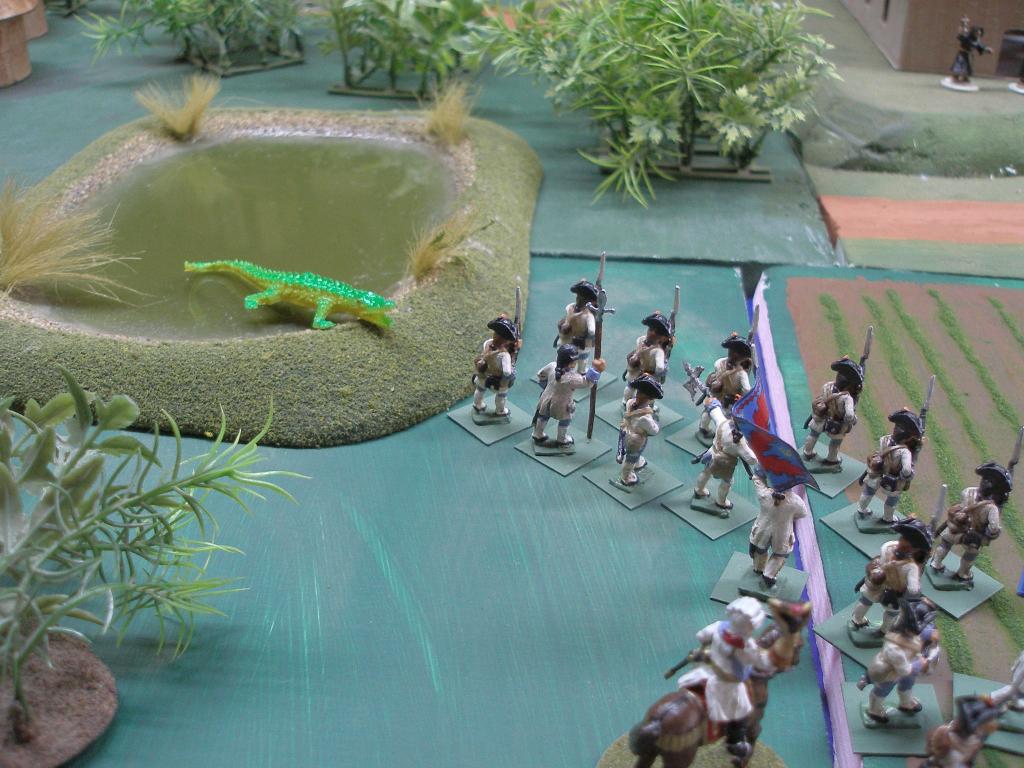
the fresh water pond guarded by the alligator.

We decided that if anyone got to close the alligator would attack and we would use the TSATF Darkest Africa rules to figure out the results.

Everyone avoided the alligator. Isn't she a beauty!!!


The Spanish make it to the village and are met
by Phil's and John's crews.

Both units in John's crew are in the foreground.
The Spanish are advancing in open order line against Phil.


Part of pirate 'Red Sonya's' (Jim) crew sneaks toward the mission. They try and keep a hill between them and the British marines and avoid the alligator.


The fight at the village takes on a new dimension
as both sides use their 'granadoes' (early hand grenades).

The granadoes were used just prior to melee and
could produce surprising results.


At the end of the game 'Red' Sonya's crew captured
a priest and found "The Cross of Coronado" a gold relic
of great value. They hadn't gotten it off the board but
had done much better than 'Smilin' Jack' or the Spanish.


The English had held the village even though 1/2 of John's crew routed off the board (into the jungle) and Phil's crew and taken a lot of casualties from the fighting with the Spanish.

Thanks to Jim for supplying some of the figures (pirates, Spanish and Marines) and to Jim and John for the pictures.

Thursday, March 10, 2011

Battle in the Korean Straits

On Saturday, February 19, we met to pit the might of the Russian Baltic Fleet against the Japanese Navy in the Straits of Korea (near the island of Tsu-Shima).  After sailing half-way around the world, would the Russians be able to best their opponents who were fighting in their own backyard?  Here's the tale.  It has been a long time in preparation but I think you will consider it worth the wait.  As usual, please click on the pictures for a larger image.

Photo by Jim
The Russian 2nd and 3rd Pacific Squadrons (as the Baltic reinforcements were called) steam in columns abreast with the Cruiser Division in the lead, followed by the 1st, 2nd, and 3rd Battle Divisions (right to left), and then two smaller cruisers.

1st Cruiser Division:  Oleg (division flag), Aurora, Dmitri Donskoi, and Vladimir Monomakh
Russian 1st Battle Division:  Knyaz Suvorov (fleet and division flag), Imperator Alexandr III, Borodino, and Oryol
Russian 2nd Battle Division: Oslybya (division flag), Sisoi Veliki, Navarin, Admiral Nakhimov
Russian 3rd Battle Division:  Imperator Nikolai I (flag), General-Admiral Graf Apraxin, Admiral Senyavin, and Admiral Ushakov
Attached Cruisers:  Izumrud and Jemchug

This was the same formation in which the Russians began the Battle of Tsu-Shima.

Photo by Jim
The Japanese Battle Squadron also assumed the same formation that it used to begin the Battle of Tsu-Shima, with three columns of cruisers leading the two heavier columns (battleships and armored cruisers on left and armored cruisers on right).

Japanese 1st Battle Division:  Mikasa (fleet and division flag), Shikashima, Fuji, Asahi, Nisshin, and Kasuga
Japanese 2nd Battle Division:  Izumo (division flag), Azuma, Tokiwa, Yakumo, Asama, Iwate
Japanese 3rd Battle Division:  Kasagi (division flag), Chitose, Otowa, Niitaka
Japanese 5th Battle Division:  Itsukushima (division flag), Chinyen, Matsushima, and Hashidate
Japanese 6th Battle Division:  Suma (division flag), Chiyoda, Akitsushima, and Izumi

The Russians had 5 modern battleships, 2 older battleships, 1 obsolete battleship, 3 coastal defense ships, 1 modern and 2 obsolete armored cruisers, and 4 protected cruisers.

The Japanese had 4 modern battlships, 1 obsolete battleship (ex-Chinese), 8 modern armored cruisers, and 11 protected cruisers (about half modern and half obsolete).

Photo by Ed
The opening moves saw the Russians steam straight ahead, probably to burst through the Japanese ships, inflict as much damage as they could, and sail to Vladivostok.  The Japanese began to maneuver to open their broadsides, with their three cruiser divisions turning to starboard and the heavier ships behind them to port.

Photo by Ed
 As the Japanese cruisers continue on their sweep around the Russians, the lead Russian cruiser division gets into close range.  Volleys are being exchanged and damages begin to mount.

Photo by Ed
The three Russian battle divisions continued their steady advance, with the 1st and 2nd divisions steaming straight ahead, while the 3rd Division and its attached cruisers slowly swing to port to meet the advancing Japanese cruisers.


Photo by Jim
Those ships that had targets open fire, some concentrating their fires and others firing at their opposite numbers.  In the background, the Russian cruiser Oleg is on fire.

Photo by Jim
 The several Japanese cruiser divisions find a lucrative target, the Russian 3rd Battle Division, composed of one obsolete battleship (Imperator Nikolai I), which is turning out of the line due to severely reduced speed, and the three coastal defense ships - General-Admiral Graf Aprazin, Admiral Senyavin, and Admiral Ushakov.  The Apraxin and Ushakov have been set afire by the Japanese shells.

Photo by Ed
But the Japanese aren't immune to fires as the ex-Chinese battleship Chinyen begins to burn.  However, the efficient crew quickly puts out the fire.

Photo by Ed
 The Russian 1st Cruiser Division (foreground) is hit hard by Japanese shells.  The cruiser Oleg (division flag) takes a number of hits that start two fires.  The Japanese cruisers in the middle ground are also hit but the Russians only start one fire.

Photo by Ed
The Japanese 1st Battle Division (background) and 2nd Battle Division (foreground) maneuver against the Russian battleships (out of picture to left).  The Japanese armored cruisers are taking some hits but the range is still too long.

Photo by Jim
Meanwhile over on the far left of the battle area, Japanese protected cruiser Akitshushima can't take any more hits and sinks in a cloud of steam.  Two of her consorts are badly damaged and are turning away from the heavier Russian ships.

Photo by Ed
In the center, the Russian cruiser Oleg succumbs to Japanese shells and sinks in a cloud of fire and steam, taking the division commander to a watery grave.  Fires still burn on a Japanese cruiser in the background.

Photo by Jim
The Japanese cruiser Otowa, newly launched and having just joined the fleet, can't stand the heavy Russian shellfire and also sinks.

Photo by Ed
Jim (left, Russian 3rd Division commander) and Jay (right, Japanese protected cruiser divisions commander) adjudicate shellfire on each other's ships.  The battle between Jim's older battleship and coast defense ships and Jay's older protected cruisers was fast and furious all game long.  The two friends have been gaming against each other since college days in the early 1970s!

Photo by Jim
All of a sudden, world history on this timeline is changed!  After the Oleg was sunk last turn, the cruiser Aurora takes the lead in the Russian 1st Cruiser Division column.  But even this never-to-be historic ship can't withstand the concentrated Japanese gunfire and he sinks in flame and steam.  Will the Russian Revolution ever start without the brave sailors from the Aurora leading the way?  Of course it will!

Photo by Ed
In the foreground, the Japanese armored cruiser Azuma has her rudder jammed by a lucky Russian shell hit and turns out of the battleline.  In the middle ground, the 1st and 2nd Russian Battle Divisions and the remnants of the 1st Cruiser Division attempt to maneuver around the Japanese 1st Battle Division (back ground).

Photo by Jim
 With the ex-Chinese battleship Chinyen taking fire in the foreground, the old Japanese cruiser Hashidate falls prey to the guns of the Russian 2nd Battle Division (off picture to right, see below).

Photo by Jim
While the battleships of the Russian 2nd Battle Division target Japanese cruisers to their left, the next Russian cruiser in line, the obsolete Dmitri Donskoi, is hit too many times.  Burning and belching steam, he plunges to Davey Jones' locker.  In the background, two of the new Russian battleships are being hit by fire from the Japanese battleships.

Photo by Ed
 In the foreground, the Japanese 1st Battle Division maneuvers to stay between the Russian battleships and their far away refuge in Vladivostok.

Photo by Jim
One of those new Russian battleships, the Borodino, is targeted by several Japanese battleships whose shells start a raging fire.  With the bridge hit and funnels badly damaged, he still limps towards the Japanese battleships.

Photo by Jim
Suddenly, the Japanese armored cruisers of the 2nd Battle Division become targets with fires started on three cruisers by Russian shells.  But their well-trained crews quickly extinguish the blazes and they continue to maintain a heavy fire against the Russian ships.

Photo by Jim
The Russian flagship, the battleship Knyaz Suvurov, is hit and begins to burn fiercely.  Fortunately the crew responds heroically to the threats and manages to extinguish the fires in short order.


Photo by Jim
Two Japanese battleships (Mikasa in lead and Fuji), although hit hard and ablaze, close on the beleagured Russian 2nd Battle Division.  Even things look bleak for these four Russian sinks, none of them were sunk.

So who won this recreation of the Battle of Tsu-Shima?

The Japanese started with 4 modern battleships, 1 obsolete ex-Chinese battleship, 8 modern armored cruisers, and 11 protected cruisers (a mix of modern and obsolete).  They lost all 11 protected cruisers either sunk or rendered combat ineffective and the ex-Chinese battleship and 1 armored cruiser were forced to withdraw because of damage.  The Russians scored 65 points from this.

The Russians started with 5 modern battleships, 2 older battleships, 1 obsolete battleship and 3 obsolete coast defense ships, 1 modern and 2 obsolete armored cruisers, and 4 modern protected cruisers.  They lost 1 modern battleship and all 3 coast defense ships, 2 obsolete armored cruisers, and 2 modern protected cruisers.  The game master decided that two battleships (1 modern and 1 obsolete) wouldn't last the night against the Japanese destroyers.  The Japanese scored 80 points from this.

While the Japanese won a tactical victory, strategically the action was a draw.  The Russians were able to get 3 modern battleships, 2 older battleships, 1 modern armored cruiser, and 2 modern protected cruisers (half their ships) through the Japanese lines and to dubious safety in Vladivostok.  The big question is whether the Russians will stick their noses out of Vladivostok to engage the successful Japanese.  Only time (and another game) will tell!